Scrap Sunday: Things the world has been waiting for. Or not.

Ages ago I came across a tutorial for a travel wallet and thought that it might be a good alternative to our usual routine of putting 5 passports and tickets in my husband’s jeans pocket. Obviously I never actually took the time to make one. But a while ago, it came back to my mind as a suitable present for my mother-in-law who travels a lot.

So, I looked for the tutorial again, only to realise that those diy versions are apparently for people with proper flight tickets. Who does still get proper tickets? Don’t we all have large print outs instead now? And it seems to be always for 2 people with space for two passports and two tickets….

In my mind I started to develop a collection of different sized travel wallets to accommodate different sized travel groups/families. Clearly another brilliant business idea. Although I also quickly realised that you do not want to take your five passports out of five different slots.

Anyway, my first attempt turned out to have far too tight pockets, mainly because I experimented with super strong interfacing decovil. So model no 1 now gets used as a powerful – almost magic – computer similar to the one Inspector Gadget’s niece uses. I am currently writing this post on it. Really.

Model No 2 turned out fit for purpose, but I finally had to admit that 3 layers of decovil are not easy to handle and not necessary.

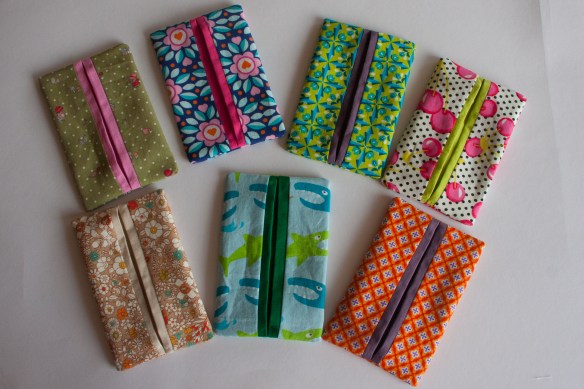
I tried to keep it simple and grown up this time.

IMG_6051

See, using only one fabric for inside is stupid as it makes it impossible to actually see the different pockets.

IMG_6050

So, there is the big slot for a folded A4 paper, information, tickets,….

a medium one for one passport and a row of smaller ones at the bottom, with one compartment for credit cards or similar things and two for pens.

Most wallets I had seen online have a lot of space for credit cards. I don’t know why. Don’t you have them in your normal wallet anyway? Do you need special travel ones? Maximum a frequent flyer card or whatever, no?

But I thought a pen could be useful.To write down email addresses and phone numbers of your newly met friends.

And last but not least I went for a zip pocket. It would be large enough for something like a mobile phone or some money. Mainly it is there because otherwise that side would look to empty.

And just in case you were wondering: I did use a different fabric for that one at least. Otherwise it would have been ridiculous, really. IMG_6054

I am still working on different sized models, prototypes before I start my successful business of necessary things the world has been waiting for. I’ll show you another one on another day but for now I need to get back to the wedding outfit. I managed to lose the essential shiny silver ribbon. Without it the diamant buttons will look a bit lost.

Modern urbanisation: turning parking space into living space

Don’t worry this has not suddenly turned into a blog about architecture and area planning. Although this might be interesting, too. As long as it is an expert talking about it, not me. This one is still about knitting and sewing. Not that I would be an expert in these fields either. But aaanyway.

It is probably not wise to start with the highlight of today’s topic rather than building up tension but I do know for a fact that some of my readers get quickly bored and never make it to the end of my in-depth analysis of things. So let’s jump right in.

This parking site has recently been transformed:IMG_5744

into this beautiful home  (still without a roof in this picture) surrounded by a moat:

IMG_5726

to be completed with either a golden roof for a beautiful castle…

IMG_5730

or a dark roof full of spider webs, cracks and bats (yes, these are bats, no weird letter “M”s) for a witch house, dangerous castle or whatever you want to imagine.

IMG_5731

The attentive readers amongst you (for all the others: no need to look away in embarrassment, I am ignoring you anyway), this is not really a transformation as clearly it is a totally brand new development which happens to have the same shape as the afore-mentioned parking space.

It is finally time to reveal the long-awaited portable magic play mat:

IMG_5729

Rather by accident, I must admit, the pocket looks very castle-y but unfortunately it is not as deep as the pocket of the original car play carpet.

But lets unfold the secret inner life of boring spotty bag (trying to rebuilt tension here):

IMG_5727

So there is a deep looking cercle in the centre, made of bricks, could be a tower or a well in the middle of the wood, depending on the story you are developing.

IMG_5728

and a deep dark cave, possibly home of a dragon, a gnome or a captured prince (trying to break up stereotypes)

But enough teasing. Lets have a look at the carpet in its full glory:

IMG_5725

So, we have different areas, a dark wood at the top, a dragon forest in the right top corner (I know, they are dinosaurs! Could you please make a little effort and switch on your imagination?!), a wolf wood, a park with magical looking birds in cages, a pink unicorn forest (I know, they are not unicorns. You are starting to bore me with your negativity), a pond (the BLUE bit of course. I mean seriously!), a bed of lollipop flowers (on request. I’ll leave it to you to guess which ones are the lollipops, but I’d try those round lollipop shaped flowers if I were you), a few other lawns with magic looking flowers and plants and a big meadow with cute little magic people, possibly fairies and elves living in there. There is also a silver / breadcrumbs trail leading from the house to one of the lawns/forests or vice versa. Who knows. Up to you.

I meant to have more dangerous, dark looking areas but strangely (and I really can’t explain this at all), I do not seem to own many dark or dangerous looking fabrics. Apart from an endless variety of dinosaur fabrics. Nevertheless, I am more than pleased with the result, I have to say.

As you can see, similar to the car play carpet, there are poppers everywhere to stick on magic items.

We have…

IMG_5738

… a magic key,

IMG_5734

… a magic ring,

IMG_5740

…. a magic wand (clearly! But you can also pretend it is a log or whatever else),

IMG_5737

… a treasure chest

IMG_5743

… with real silk lining – would you expect anything less?

IMG_5739

….um… a bottle of magic potion (not my finest work, I have to admit. And I did get told off for this one)

IMG_5732

… a magic book. Clearly my favourite. If not the only one out of the set I really like.

I guess my main problem with these “props” is their inconsistency. The treasure chest is really 3D, the book is beautifully “drawn”, similar to all the decoration on the house, the bottle is just nonsense, all the others are much more simple. I guess they should all look a bit like the book. With embroidery as a main feature. Even if then the treasure chest would lose its main feature. What do you think? Which one is your favourite?

Also, would you prefer playing on the car carpet or on the magic one?

img_5396-2


IMG_5725

In any case, after a very slow start I really enjoyed the project, especially the free hand machine embroidery. Remember when I did that 3 hours course at Tilly and the buttons back in London? I really want to explore this technique even more and finally invest in a proper embroidery foot for my machine. Plus, I have realised that I have to take the “using up my fabric scraps” project a little bit more seriously.

But it is almost May, time to focus on Me Made May, so the scraps will have to wait.


Scrap Sunday: The upcycling bag

For this one we need to start way back, a couple of years ago ….

Once upon a time…. don’t worry, it won’t get that bad.

Anyway, years ago, I have made a small shoulder bag for my daughter’s best friend. As I quite liked it I made a few more for other friends.

I never actually saw the little girl using her bag. It was always her mother carrying it with this very insisting and slightly scary glare in her eyes… until I made her her own. And one for my equally glaring daughter.

My friend seemed happy. But not only did she continue carrying her daughter’s bag around, she also kept telling me “casually”  that her other daughter really liked those bags and that the poor child was interested in placing an order and paying real money for it.

Around the same time she gave me her daughters old rain coat with the words that maybe I could use it for one of my sewing projects. After years and years of heavy hint dropping I finally gave in and made my first proper upcycling project. A bag made out of an old rain coat. Apologies for not taking a picture of the original rain coat but here is the bag:

I chose a London themed lining as it was supposed to be a bag for a young lady so it needed to be cool rather than the usual childish stuff. I am extremely pleased with the result, think it really looks cool. I am not sure what the girl thinks. Probably she never got it, instead there will be a blond woman running through London carrying three bags and glaring at other people who dare carrying nice bags. If you ever see her, don’t look her straight in the eyes, slowly move backwards and keep your bag tightly.

Oh, and just for the record, I also made another one for my niece who asked for  one for her birthday a few weeks ago.

I suppose my niece liked it… Thinking of it, I haven’t handed it over myself, maybe she never got it and there is a glaring lady with 4 bags running through London…


Scrap Sunday: Slightly bigger tissue issue

I know you are waiting for the big one, but let me tell you one thing: moving houses, actually moving countries with three children takes up slightly more time than one would have thought. Especially at the end of term with all those extra activities to attend.

Sure, they all help a lot, sorting out toys, peeling down wall stickers,…

Especially the little one. He kindly wakes me up at 5 o’clock in the morning, so I can make the most of my day and then goes and searches for all those small pieces on the floor that my old eye can’t even spot and examines them carefully if they needed to be processed any further. In which case he takes care of them and kindly hands them to me after a day or two.

He is actually a big fan of tissues hence the big tissue issue you are all waiting for. But back to the small one for now.

Initially I thought that there won’t be any teachers’ presents this year but very last minute (we are speaking of the eve of the last nursery day) I decided they should get something. It just wouldn’t have been fair.When my daughter had left her nursery, I had made bags and badge holders using fabrics I had used for her clothes.

So I quickly cut out lots of squares for tissue covers.

IMG_5348

I had found the pattern when I was looking for my knitted one from last week. Funnily enough this one by Two Brown Birds features also contrasting edges (through the lining fabric)

At 7 am the next morning (I’m sure the neighbours appreciated I hadn’t started using the sewing machine at 5am) I quickly made the 4 I needed for nursery.  The other ones followed later that day and the next morning. I have to say, this project is really quick. Basically 4 seams with a little bit of ironing in between (ideally). However, it annoys me to know that there are ugly seams inside which can potentially be seen. I zigzagged them as well as I found it not secure enough with raw edges.  And I do wonder how much more time it would cost to make a reversible version. But enough talking, lets have a look. I guess you’ll recognize some of the fabrics.

IMG_5349

IMG_5364

I’ve tried to use some of the fabrics the teachers might now (difficult due to uniform, so it is all about the sunhats)  so they would actually be reminded of my children,

IMG_5370

or fabric to match their personal style:

IMG_5371

IMG_5368

or cute fabric (you know because my children are cute)

IMG_5352

IMG_5350

IMG_5367

or because a pretty piece of fabric had about the right size

IMG_5369

IMG_5365

IMG_5351

or simply because it was the manliest and scariest fabric I found (for the male deputy head teacher 🙂 ) – which happens to be a hopefully good reminder of my son too (not because he is scary)

IMG_5366

Which one do you like best? I find it really hard to decide.

Oh, and in case you were expecting another post about tissue issues soon, forget it. The packers are coming tomorrow and the whole week will be about getting to Vienna, settling in and unpacking some of those boxes.

So, enjoy the blog free time as long as you can – I’ll be back