Quick catch up

As you know, I am most productive when I have my children around. Still not sure why. But I can definitely get a lot done when they play next to me. At least as long as they don’t fight or try to burn the house down.

So actually I was really busy during the first half of the Easter break. I am still working on a big yoga bag order but I did take some breaks (when I had done my daily task) and made a few things for my children.

The least exciting one would be this shirt, using the left overs from my niece’s shirt in combination with a stripy jersey that was once in a “surprise bag” from Michas Stoffecke and a cheap grey jersey from Shepherds Bush, initially intended as trial material on my search for the perfect breastfeeding top (which I will ideally make while still breastfeeding)

IMG_4706

IMG_4707

I used my usual pattydoo pattern but I am now normally hiding the seam at the neck which looks much more professional:

IMG_4708

and I am trying out a new stitch for the hem. I used the twin needle in the past and was really pleased with the look but that seam actually fell apart in some of the shirts which is not exactly ideal.

IMG_4710

I am not sure if I have even posted a picture of the initial girl version, made in February already:

The second most exciting item was a dress, using a klimperklein pattern and a pink flowery sweat that I have since a while:

IMG_4719

I find this dress really cool. I think the sporty raglan pattern and the colour of the heart go very well in combination with the rather girly fabric.

So two lovely projects for two lovely children but the loveliest (project, not child – they are all exactly the same lovely) of all is still to be shown:

IMG_4701

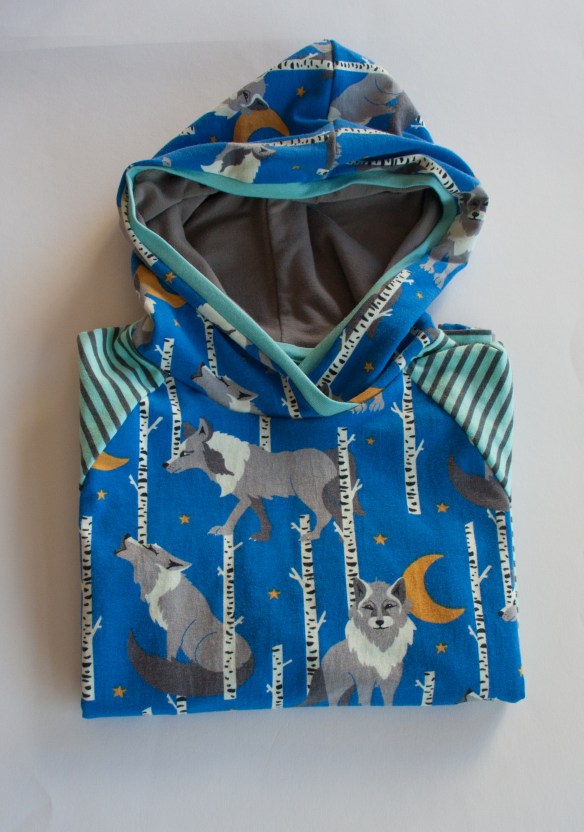
A reversible jacket with a pointy hood. Just right for the “in between seasons” season.

IMG_4705

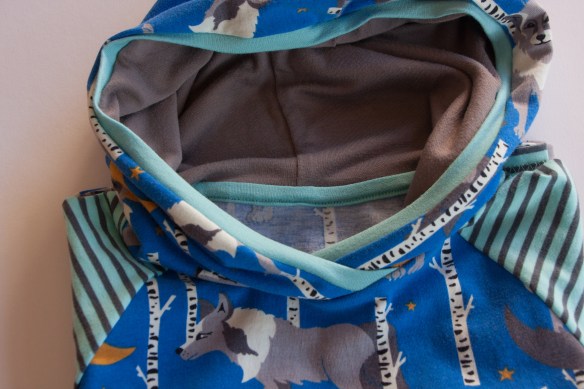
I didn’t have enough of the brown car sweat left for the whole jacket so I made blue sleeves. Then I thought that the inner jacket should similarly have different sleeves but I am not entirely sure about it. It looks a bit odd. Maybe I should have done the hood in the orange stripes as well. Plus the teal of the star fabric doesn’t go with the blue of the sleeves but I was really keen on using it. It is a lovely fabric, almost a bit of a waste to be used as lining only. I can’t wait until the outside gets vomit on it so I’ll have an excuse to turn it.

I have used another klimperklein pattern, this time from her book. I was so excited to get that book. When it finally arrived I was slightly disappointed at first. I guess, after all the great e-books I expected much more pictures and variations of each pattern. Which is silly and totally my fault. A book simply can’t provide the same amount of  step by step pictures and 20 variations of each item. And actually the author Pauline Dohmen must have thought the same as she is now even publishing amazing tutorials on her blog for the most crucial questions. Like how to properly sew and turn a reversible jacket…. or a lined coat :). The tutorial landed in my inbox just about a week after I had struggled with the coat! What a bad timing. But I will now know forever how to do this 🙂

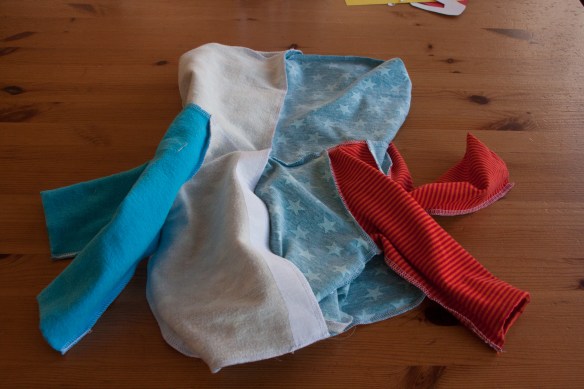
Just a few pictures of my little jacket, a proper tutorial  can be found on the klimperklein blog.

First, the two jackets sewn together, except at the sleeves. The two jackets are NOT to be put inside each other. (And obviously, there is a gap at one of the side seams of the inner jacket so they can later be turned inside out):

IMG_4695

Now, join the sleeves, being careful not to twist them. Pauline Dohmen refers to it as kissing elephant trunks. What a useful image!

Finally, the jackets fully sewn together – except the turning gap at the inner jacket, you can see it on the left side.

IMG_4699

I love that little jacket so much, I have never been happier to live in England where it will be just the right weather for an “in between season” jacket for another 6 months 🙂


the coat

I am not sure if I have ever mentioned it but I have been rather busy lately making a coat for myself. Did I? Really? Anyway, here it is. My coat. For me. And I can proudly say, so far no baby vomit on it 🙂 And the weather these days is perfect for wearing it. Cold but sunny. So no need for the rain coat that I am usually wearing.

Sorry for the quality of the pictures – they do not do justice to my precious coat, it would deserve a professional photographer and a professional model but this is all I’ve got 🙂

IMG_4552The initial pattern is from Burda if I remember correctly but with the help of my teacher from fashion class this pattern has been changed significantly. (It was mainly my teacher working and me watching, breastfeeding and making clever comments)

IMG_4568 IMG_4566 IMG_4559

The fabric (wool with crazy flower embroidery) and the lining (a really strange colour between green and yellow, somehow difficult to get right on the pictures) have been sitting under my desk for a year waiting to finally be transformed into something wearable. And there is still enough left for a short dress next year, post breastfeeding.

IMG_4556As you can see, I did struggle a bit with the hem. Actually I meant to join fabric coat and lining coat at hem and sleeves  and then turn the two coats inside out. Obviously it wasn’t as simple as I thought and I ended up with a huge thing with both lining sleeves coming out of the woolen sleeves 🙂 I really should have taken a picture. So I had to open my seams and get things right. I then struggled a bit with the length of the lining and getting the hem straight. But no one will be noticing the slight imperfections at the inside. Unless I would do something as silly as pointing them out to lots of people, say in a blog post.

IMG_4572

I made three button holes and chose coconut buttons. They should become a little bit darker with the time and will then be perfect. I might add a forth button as I have realised that they are too high up. The coat flaps a bit too much when I am walking.

IMG_4573I also added welt pockets, second time I made them. (First time I added them on a red riding hood cape to practise for my own coat – I still owe you that)

Enough for today, now I will link this post to RUMS – a lovely blog where women can show off what they have made for themselves and will see what others have created for their own pleasure this week.

Scrap Sunday: tag blanket

Today’s scrap post is just a quick picture of an idea how you could use up some scrap fabric and small pieces of ribbons and trimmings. Again, I didn’t make it. Don’t have time, sorry. I really need to finish my coat.

Yes I said my coat. And yes, I said my coat. Nothing for the children. No, for me. Yes, a coat. It is still cold enough to wear a coat. Which vomiting baby will destroy it in seconds? I have no idea what you are talking about. It is my coat, I will wear it every day. At least when said baby is nowhere near me. Or turned 18 and stopped ruining my clothes. And I will just put those button holes in today, that should be doable and then I will show you my coat. As soon as I have taken pictures of it. Possibly with me in it. So I just need someone to take the pictures and the baby in a different part of the country. Easy.

Oh, yes, the Sunday scrap project. Something for the  baby this time. (You see, I need to make up for all the things I just said. I don’t really want the baby in a different part of the country. Just no vomit on my coat).

So, my older ones have kindly surprised me with all the baby toys that were still safely tidied away at the far back of the wardrobe. They wanted to help me by getting them ready for the baby who can not hold toys yet. Thank you guys.

They found this tag blanket.

IMG_4549

Not a new idea. But a good idea. I am a big fan of toys made of fabric. They are easy to wash, the unattended baby can not hurt himself. It can be chewed on and I prefer chewed on fabric much more than chewed on plastic made in China.

A little bit off topic: There is this little shop in Vienna. Galerie Sonnenschein in Neubaugasse. It is a great shop and the owner makes the cutest toys out of fabric – not the one in the picture but other lovely things, rattles,…. If you ever are in Vienna, go there and get some baby toys.

So, I will make one of these once my coat is done. Did I mention that I am currently making a coat for myself? Yes? Are you sure? Cause it is a beautiful coat. For me.

I will do a little bit of research about noise making devices for baby toys. I am thinking of putting in a crinkle material or possibly a rattle thingy rather than that little bell. That doesn’t look that healthy to eat. I’ll show you once it is done.


The bib project – part 2

If you have missed part 1 (or want to remind yourself of the incredible important thoughts about the perfect bib) then have a look here. And please remember, we are going to talk about apparently disgusting things, so please do not continue to read if you happen to be sensitive to any kind of material coming out of babies.

I think we have all agreed on the fact that there is no such thing as the one perfect bib. It will always depend on the circumstances.

So lets have a look at different shapes today, starting with triangular types.

We had the fancy reversible one here – this is definitely a very good present for a new(ish) baby, quick to make, uses up scrap fabric and looks incredibly stylish.

I have just made a few more actually:

IMG_4541They have one patterned and one stripy side and will be teamed up with a matching hat, both made from klimperklein patterns:

IMG_4539

Another triangular version would be even quicker to make: When I run out of posh bibs I often end up folding a muslin square in half. It is a little bit bulky, especially if you try to tie a knot at the back of a tiny baby neck. However, it doesn’t just cover the front, it protects the shoulders easily, too. And obviously due to the amount of fabric involved, it soaks up a lot. Saliva. Snot. Vomit. Or any mixture of the above mentioned.

If there is no need for huge amounts of fabric, you could just cut a muslin square diagonally in half and finish the open edge with a rolled hem or fold it twice and stitch.

IMG_4527I guess this is quite a good solution if you need many bibs but maybe not for enormous amounts of whatever.  They are very practical, easy to wash and dry, cheap and the neutral colour matches any outfit. However, as I said, they are not necessarily able to soak up as much as other bibs. I went quickly back to the original sized muslin square folded in half. Sometimes I actually use that version to cover a cute bib from getting spoiled before we have been able to show it off 🙂 And the baby looks sort of cute with it too. So instead of a young Shakespeare (see part 1) he reminds me more of a young John Wayne.

So a definite thumbs up for a folded muslin square.

As you can see on the picture, the muslin triangle is rather deep. Or high. Which might not be needed if you are aiming for stylish looking neck wear without any purpose other than looking stylish. So, if you wanted to make your own single layered triangular baby scarf, then I would take a nice stretchy fabric, jersey or interlock, cut out a triangle,  about 70cm long and in the middle about 20cm wide, roll hem around the whole thing (easier if the third edge of the triangle is not actually a edge but rather a curve. Done.

IMG_4543I haven’t made this one. We bought it six years ago for our first child. When I still thought any kind of bib will do for a vomiting child (I guess, it wasn’t as bad as this time round). It looks very nice. And stylish. Even on older children. So, I do not regret the purchase of it. But I will definitely not bother to make another one right now. It would be a waste of time.

So, that is the triangles done. Lets have a look at the classic bib shape.

There are the ones with a binding around all edges which will then become the fastening.

I have only seen them in a rather rectangular shape. We got a few as presents, they were handmade by someone and are really cute. And they have been excellent for slightly bigger babies and toddlers when eating.

IMG_4544The big one is about 40cm long. Great coverage of the whole child 🙂 I might make some more in a couple of months. I am not sure about the straps to be tied at the back.

Velcro is another option but  other items will get stuck to it in the washing unless you actually had actually bothered closing it. So my personal favourite are definitely snap fasteners.

But back to bib shapes.

The bibs which usually come with these newborn sets that you get everywhere are tiny. I am not even sure for which purpose they are destined…. but it is definitely not reflux.

IMG_4545Just look at the difference! We own quite a few of these tiny ones. Clearly I hadn’t taken the  search for the perfect bib seriously enough with child No 2.

By now you are probably not only extremely bored but also wondering why I keep showing you things that I haven’t even made myself. Right. So the first one I have made myself (apart from the muslin triangle) was this one.

IMG_4390I had searched online what people suggested. For this one I followed a tutorial by Hamburger Liebe.

I found another interesting freebook at farbenmix  – a great idea to use up old t-shirts. It is a very different look, rather cool than cute and I guess a great idea for personalised gifts for bigger babies and toddlers. So click on the link and have a look there. Who knows, I might make one of these one day.

But back to the one I made. I don’t think having the fastening at the back is ideal for a tiny baby as they tend to lie on their back the whole day. So I adapted the shape for our needs and put the fastening on the side.

IMG_4424

This is much better. Almost perfect actually 🙂 I think it could be a bit wider on the sides to cover the shoulders but to be honest I haven’t tried that out yet.

(As some people – who were rather impressed by the amount of vomit that seems to fit into my son – have pointed out, the perfect shape would actually be an apron with sleeves, similar to the ones they have for arts and crafts in nursery. Protectionwise that might be true, a considerable percentage actually goes down the sleeves. But it just looks wrong. Slightly obsessed. And I am definitely not obsessed.)

Enough for today, next time we will look at the perfect fabric choice for the different textures potentially ejected on those bibs. . Stay tuned 🙂